Pantry Insights

Pantry Organization: Get Going with these 9 Steps!

If you’re ready to get started organizing your pantry but not sure how, this post is for you!

I’m here to help you break it down into a 9 simple steps so that you can notice a difference today!

Everyone is busy but I promise making a bit of time to tackle your pantry will be something that makes a big difference in your daily life. The steps below can be done together at one time or in increments. If you choose to separate them into increments of time, I recommend trying to do them in consecutive days if possible. You don’t want to lose your momentum.

  1. Review all food and throw out any items that are expired. I really do encourage taking everything out of your pantry if you have time. That is the only way to really SEE what you have.

  2. Identify any food that is not expired but that you know you or your family will no longer eat and gather it for donation. This is a great way to give back to those in need.

  3. Identify your categories of food. I’ve included some sample categories below but make sure you identify what works for you.

    breakfast ~ snack bars ~ pasta ~ rice ~ bread ~ baking ~ canned soup ~ canned veggies ~ toppings/seasonings ~ overstock ~ kid’s snacks ~ specialty snacks ~ dry storage ~ chips

  4. Begin grouping all of your like foods together. Based on the categories from step #3, move all of the items from each category together.

    Pro Tip: don’t get hung up on one or two odd items, focus on the foods that make up a majority of your pantry, we will deal with the odd items at the end.

  5. Once you have everything grouped in place, evaluate or even take photos of how much you have any each category. This is key in picking the right products.

  6. Take measurements and lots of photos before you start shopping for product!

  7. Purchase what ever product you are missing. If you have some existing storage items keep them handy. I usually map out the space by placing all of my empty containers on the empty shelves to make sure I like the loop and style of the layout. I also identify which items are going to be stored in which types of containers while keeping in mind the amounts I have on hand.

    If I always have 6+ bags on chips open at any given time, I am going to need a larger bin than if I only have 1-2 flavors open at a time.

    Examples of products I buy for my own pantry!

    Pro Tip: don’t skin this step. Bins and baskets do not have to be expensive but without them the work you’ve put in so far will surely undo itself in short time. The containment and compartmentalization is the KEY to staying organized.

  8. Don’t forget to label! It doesn’t have to be fancy but without a label you’re setting yourself up for failure. Harsh, I know, but it’s the truth. Check out my favorite labeling products here. For less than $45 you can have a label maker and multiple tape styles/colors!

  9. Lastly, review your pantry with anyone living in the home. This will help ensure that everyone is on the same page and is dedicated to putting all of your food items where they belong!

Look at that. You did it! Don’t be afraid to make changes when appropriate. It is your space make sure that it works for you!

Deep Shelves?

If you don’t have pull out shelves, using bins is helpful to access the deeper parts of the cabinet.

In the example here, you can pull out the first clear bin to access the one behind making that deep part of the space more accessible.

Clear bins help make sure you can see what you have back there in that deep dark cupboard.

Full Disclosure: Some items linked here are part of the Amazon Affiliate program and I will receive a small commission at no cost to you. Not all items are affiliated, some are just favorites, I’d like to share!

Containing Can Choas - 5 Options to Fit Your Pantry

There are a handful of different ways that can be used for canned food organization. Cans are often a culprit of pantry disorganization as they often get stacked or pushed to the back. Both problems lead to not being able to really SEE what you have and how much. Below, I have outlined a few different products that help to contain them and add a more organized look to your food storage.

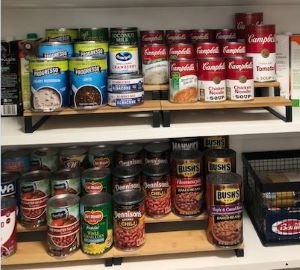
  1. Tiered Can Risers - This style is the probably the type I use most often. There are a variety of styles and materials and costs are relatively inexpensive. The one downside is they can take up a lot of space on the shelf so if you are somewhat limited, you might want to consider some of the other styles. One other item to consider is that you cannot see the full label so the best practice would be stacking only the same item behind the front item with the newest in the back. The ones shown in the photo are actually 2 sets of an adjustable option that I separated to create two even displays but if you don’t have many items to store 1 adjustable riser may do the trick.

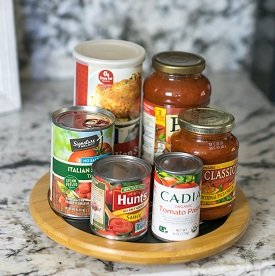
2. Lazy Susan Can Display - My pantry has a lot of tight corners so I use single tier bamboo lazy susans for some of my can categories. For example, I use one for soups and another for sauces and broths. This option will not hold as many as other products and likely not all of your cans can be stored this way but I find it helpful for certain items that I access regularly. Here’s the link to the ones I use in my pantry!

3. Tiered Rolling Rack - This option works great on using vertical space and still allowing you to see many of the labels for your cans. They come in a variety of materials and are gravity feed to make add a bit of efficiency. Be sure to measure before you purchase as these are often not adjustable and can be quite bulky. Here is a great option that goes with a black and bamboo design.

4. File Folder Bins from the Container Store - I saw this on Pinterest and think it could be a great solution for certain pantries or storage set ups. Having a bin allows you to grab it out of the space easily to refill or prep in bulk. I also like how you can individualize the categories but I do think this would work best for your bulk items and maybe use another solution for your one-off cans. You don’t want to use an entire bins for something you only have one or two of.

5. Wall Mounted Custom Dispenser - This is one is an Etsy find that could be really cool if you have the space and the ability to install something custom. If you are up for a challenge it could be a great DIY project as well. I love that you can still see quantities and again, this is a great option for things you keep on hand in bulk.

5 Steps to Maintaining Your Organized Pantry

Once you have done the work to get the pantry organized, it is important to incorporate a few new habits so that your hard work doesn’t revert to the chaos you have already overcome. Here are 5 tips that I used in my own pantry and recommend for my clients to keep their spaces looking tidy.

  1. Utilize Backstock Bins - I often buy in bulk and end up with duplicates. The trick to this being helpful is keeping your backstock in a close place so you don’t forget that you already have a backup of particular items. It is the worst to go buy more of something you think you are out of and come home to find you already had a back up . Here are my favorite baskets.

  2. Place Newer Duplicated Behind Older Ones - If I have multiples of something, I always place the older item to the front of the shelf. This helps me use what needs to be used first and helps limit waste due to expiration or multiple items of the same thing being opened at the same time.

  3. Monthly Review of Expired Food / Food Not Being Eaten - I try to do a monthly review of all the dry goods in my pantry and check for expired items or close to expired. I also look for food that my family is just not eating. If it is not being eaten and isn’t expired consider donating to a local food pantry.

  4. Establish and Update Labeling As Needed - Your food changes. New meal plans, new dietary restrictions, new people in the home. Just being you labeled your bins to start with, doesn’t mean they will stay that way. This is a small but impactful task so you don’t end up with overflowing bins or even worse consistently empty bins. If your food changes/shifts so should you labels.

  5. Update Product To Accommodate Changes - Similarly to updating labels often, I review if the product I am using is still working for my items & quantities. Often times I walk into pantry that do have some product in place already but often that 1 bin is overflowing onto the surrounding shelves so it is just about sourcing better product that is actually going to capture the entirety of that group.

DON”T FORGET - Key to sustained success is getting the entire family on board. Having clear labels and appropriate sized bins will help your family in making sure when they return items they go in the right place.

I hope this information was helpful! Keep me posted on your projects, I love to see your pictures.

Full Disclosure: Some items linked here are part of the Amazon Affiliate program and I will receive a small commission at no cost to you. Not all items are affiliated, some are just favorites, I’d like to share!
The Low Down on Lazy Susans!

No, I am not talking about your mom’s lazy friend Susan. I am talking about the most functional organizing tool I have every used and something that probably ranks highest as one of my favorite things of all time.

In my opinion Lazy Susan‘s are one of the most versatile organizing tools out there! I have found uses for them in almost every different space in the home and the many variations that are available make incorporating them a no-brainer. Check out my favorite ones here!

Below you’re going to find examples of all of the different ways I have used Lazy Susan‘s and also a few different types of lazy susans that I have found useful throughout my organizing career.

  • Pantries: They are great for tight corners or even those hard to reach top shelves. I’ve used them to organize oils, spices, spreads, canned goods.

  • Bathrooms/Medicine Cabinets: They are great for under the sink storage or bathroom shelving and provide the perfect option for hair, face and body products. I have also used them for vitamins and supplements.

  • Craft Rooms: Divided lazy susans are great for organizing craft supplies; whether, it’s separating different types of art materials or crafting tools, they really can be a game changer. The fact that you can pick them up and bring there to where you are working also is an added bonus.

    I’ve used lazy susans in all different types of material including bamboo, acrylic, plastic, or metal. You really can find one that fits the look and style of your space. Lazy susans can be: single layer, two-tiered or divided.

    They also come in a variety of sizes so make sure you measure your space. Usually 10’’, 12’’ and 14’’ circles are the most common.

Full Disclosure: Some items linked here are part of the Amazon Affiliate program and I will receive a small commission at no cost to you. Not all items are affiliated, some are just favorites, I’d like to share!